This new chapter introduces the latest progress of Camel Designer, searching to further simplify the process of modelling Apache Camel integrations. It also looks at partnering intuitive visual design with fast trial-and-error cycles (with Camel JBang) to deliver augmented productivity for developers.
Why you should keep reading? What’s interesting about this article?
- Find details about the latest progress made in Camel Designer
- Look at a fully working flow created with Camel Designer
- Get to know Camel JBang!, the perfect match to run your Camel designs.
Table of Contents
- Introduction
- Easy use of process variables
- Abstracting technical details
- Fast prototyping with Camel JBang
- Final words
Introduction
It’s been a couple of years since I posted my blog introducing Camel Designer. No-Code/Low-Code tools have boomed since then, which reinforces the idea of an ever-increasing appetite for visual interfaces. To succeed in accelerating the development process, they should be effective in helping the user quickly feel comfortable and lower the barrier using the technology.
From the begining, the focus of Camel Designer has always been the process modelling aspect, trying to provide an intuitive experience to develop integration flows. That is not an easy task. If the visual interface does not implement the right ideas, the user will end up feeling restricted and not obtaining real benefits.
It’s important to identify and iterate over usability alternatives. And it takes time to try out different approaches and see which one works best. Each language and technology brings its own usage challenges. Apache Camel is particularly rich, dynamic and flexible in functionality. With so many options, the user can easily feel overwhelmed. To successfully assist the developer, an effective visual interface needs to introduce abstractions and open easy pathways, breaking through the tech’s intricacies.
You will discover, as you continue reading, how the latest advances of Camel Designer, going through this search and discovery process, concentrate on pursuing a formula that feels natural to the user.
Easy use of process variables
The latest release (available in VSCode’s marketplace) adds a new configuration system that simplifies the handling of process variables on route activities (Camel steps).
Here’s an example, let’s say the Camel process definition (route) makes a system callout, and your process needs to retain key data fields from the response payload that looks like the following JSON extract:
{

  "first_name": "Clint",
  "last_name":  "Eastwood",

}
Camel Designer now provides an interface that allows you to define variables (Camel headers/properties/body) you can later map with drag and drop actions, without having to manually type them in. Let’s see how that’s done.
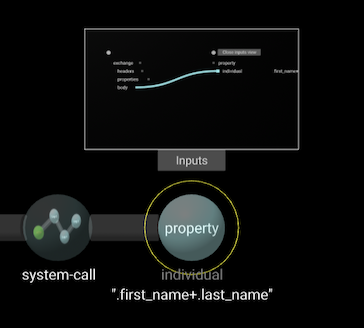
The image above shows an example activity [system-call] that retrieves JSON data (snippet shown above) from a remote endpoint. The [property] activity that follows defines a process variable [individual] configured with a JQ expression.
Tip:
JQ is a powerful JSON processor that Camel includes, ideal for evaluating JSON data.
The thumbnail you see on top of the [property] activity renders a small preview of its configuration. When you click on the [Inputs] button, the new configuration view opens, as shown below:
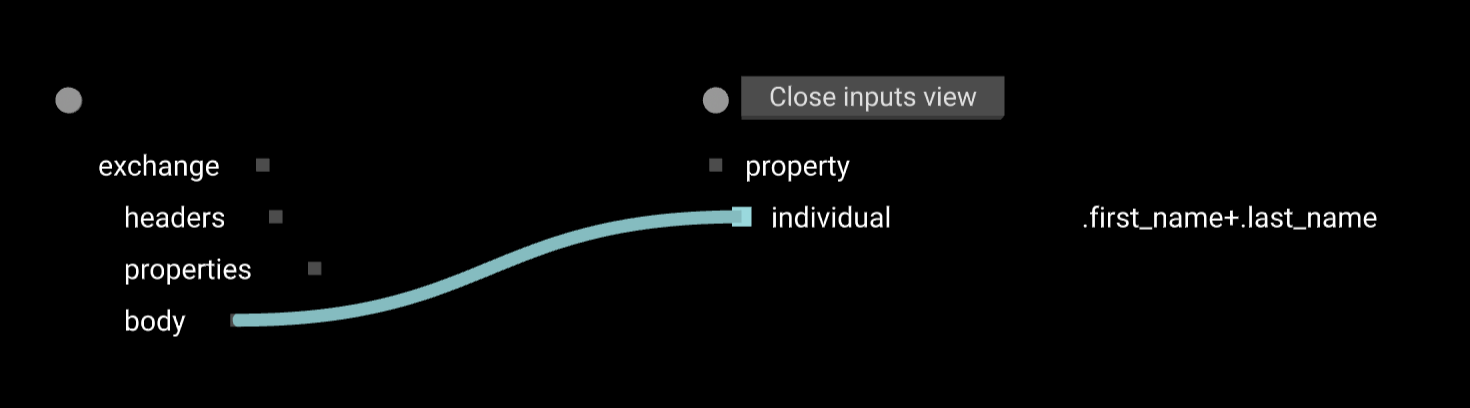
The ‘Inputs’ view shows source elements (left side) and target elements (right side). In the above example, the blue line represents the data mapping between source and target. The property is populated from the [body] that contains the JSON response.
The user can rename the property by:
- 1) Clicking on the label
- 2) Typing the new name
- 3) Pressing
<Enter>
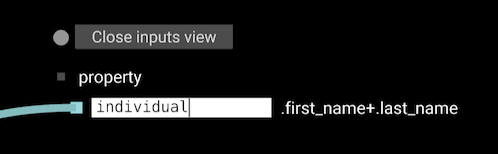
Camel offers different expression languages to set values. By hovering the mouse over the label on the right (the value) the user can select the expression language from the dropdown list:
Finally, by clicking on the value’s slot (grey box), the user is prompted to enter the expression. In the example above two JSON fields, [first_name] and [last_name], are concatenated using the JQ language.
One great accelerator that Camel Designer implements is the mechanism of indexing all processing variables all along the processing flow. When the process (Camel route) defines several variables (Camel headers/properties), they’re all available as source fields. The user can map them, from the configuration view, as the illustration below shows:
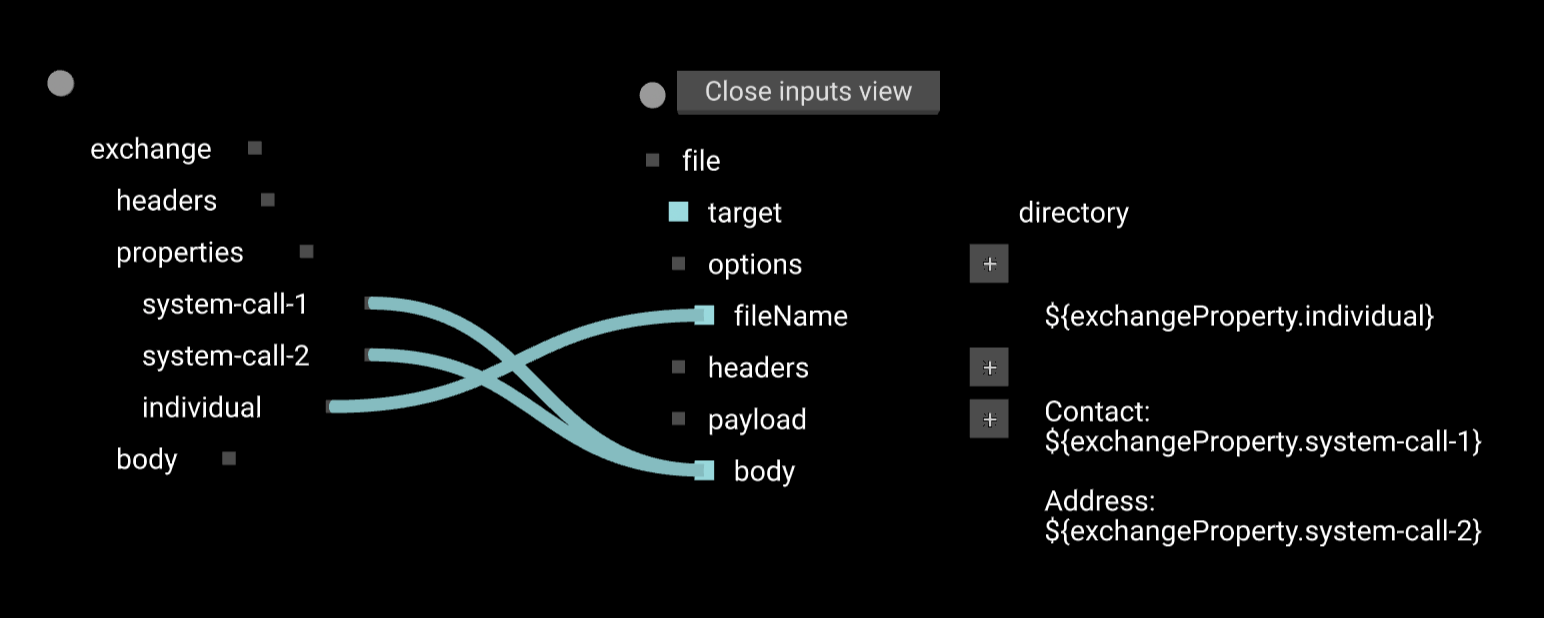
The above image represents the configuration of a ‘Write-to-File’ activity (in Camel, the File component). You’ll notice the left data structure (source data) includes the [individual] variable previously defined, and also data obtained from multiple system calls.
To define the name of the target file, the user can drag and drop from left to right the variable [individual], delegating on Camel Designer to resolve the syntax to use when referencing variables.
The user defines the data to be written on file by dragging and dropping sources, [system-call-1] and [system-call-2], to the target’s [body].
Tip: the above mapping functionality implements Camel-specific ‘variables & language’ awareness, resembling in a way pure data mapping processors (such as AtlasMap and XSLT) that you can also include in your Camel route. Learn more about how Camel Designer integrates with AtlasMap in the following blog entry in ‘camel.apache.org’.
Abstracting technical details
Another great example of how Camel Designer simplifies the process of creating Camel integrations is the following. Typically, when communicating with external systems, you need to prepare each invocation beforehand by setting:
- Connector options
- Message headers
- Message payload
This preparation sequence requires in Camel a series of DSL (Domain Specific Language) instructions that often result in a long piece of code difficult to read, and visually confusing to the user.
This is true for instance when preparing an HTTP call in Camel. Let’s say you want to include URI parameters, various HTTP headers, and the main body of data. Its Camel implementation, in our example below using the XML DSL, would look something similar to:
<setHeader name="content-type">
<simple>application/json</simple>
</setHeader>
<setHeader name="user-id">
<simple>${body.userId}</simple>
</setHeader>
<setHeader name="header-3">
<simple>header-3</simple>
</setHeader>
<setHeader name="header-4">
<simple>header-4</simple>
</setHeader>
<setBody>
<simple>{"address","${body.address}"}</simple>
</setBody>
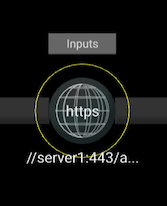
<to uri="https://server1:443/api/address?httpMethod=POST&system-id={{config.system.id}}">
Camel Designer abstracts, as one atomic action, the sequence of steps from the snippet above (in this case six Camel instructions). The rendering below shows the result: a single activity that encapsulates all the necessary logic.
Without this encapsulation, a visual representation would require a chain of six activities to compose one HTTP call. In Camel Designer, reading the process flow becomes more clear. The inner boundaries between tasks, all along the processing flow, are less fuzzy. It becomes visually instinctive for the developer to locate all the information required to define an HTTP interaction.
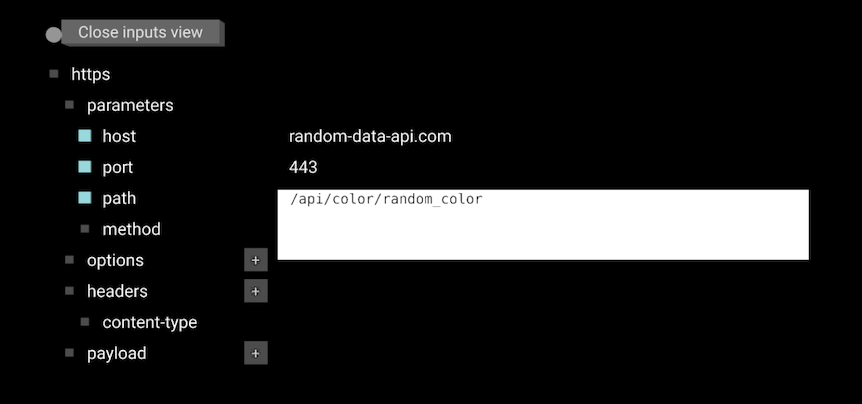
By opening the configuration view, the user can explore and edit the details of the HTTP invocation, as the image below shows:
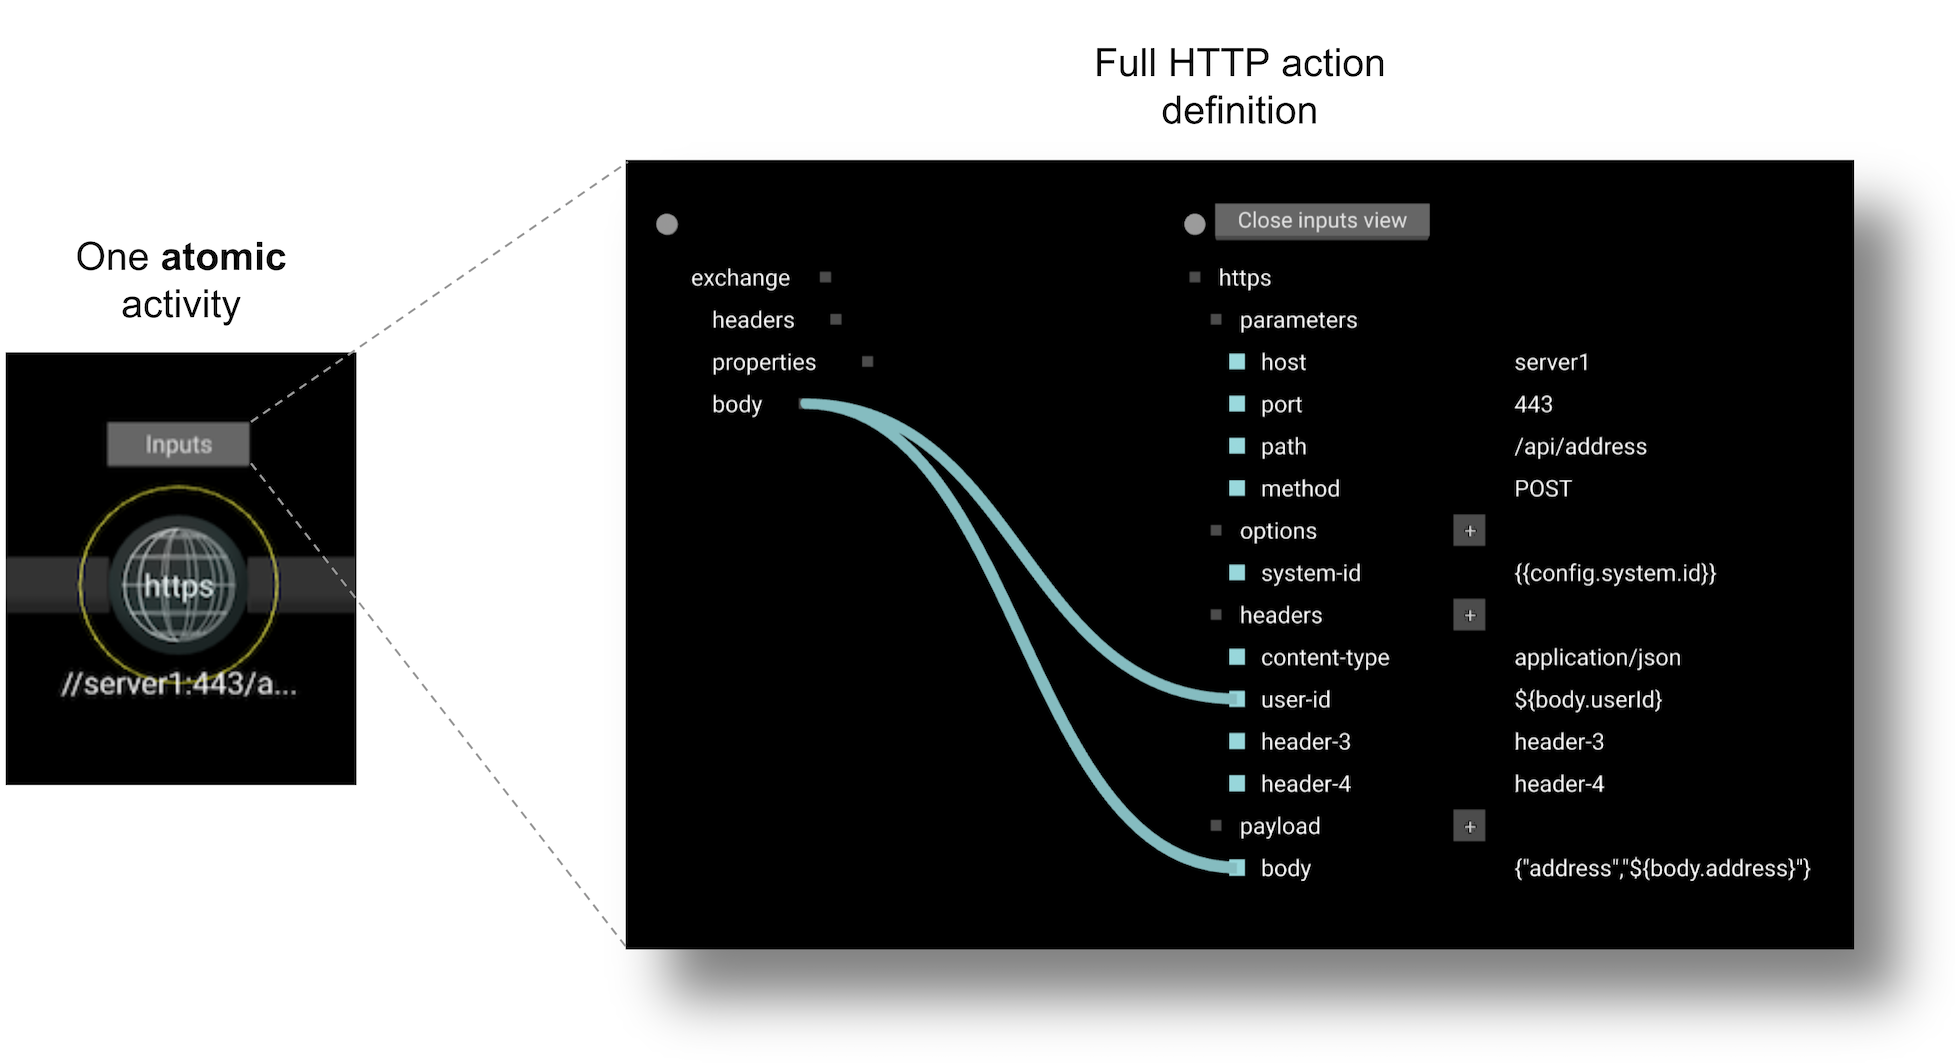
As we can see in the configuration above, the HTTP activity gathers all the information relative to the message to be sent over the wire: URL with query parameters, HTTP headers and the main payload. It’s easy to add and remove headers and query parameters, by clicking the [+] button (add) or [x] button (remove). All this information lives under one single HTTP action.
This encapsulation helps developers to easily read and navigate entire integration definitions composed of multiple external calls:
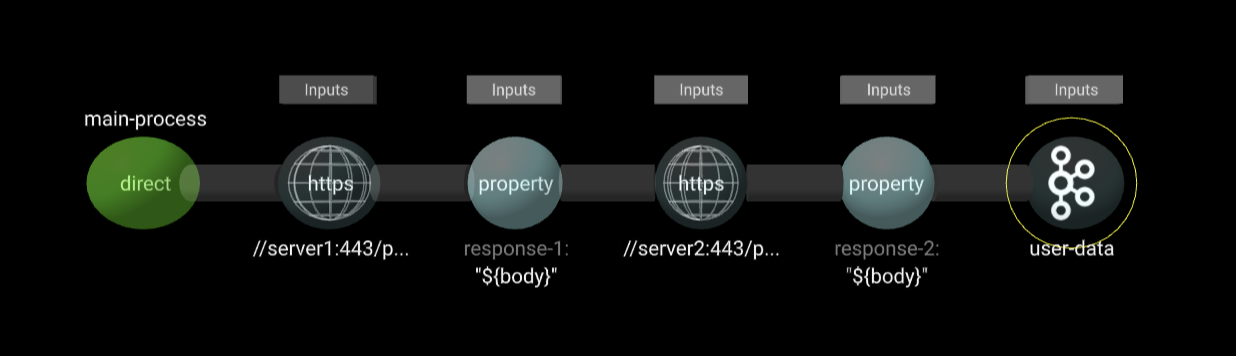
The above example illustrates an end-to-end process where the Camel route calls two HTTP endpoints (preserving response data in variables) and then sends an event to Kafka using collected HTTP data.
Fast prototyping with Camel JBang!
Camel Designer assists developers in the process of constructing Camel routes. However, a vital aspect for the developer is fast prototyping: iterate trial-and-error cycles to validate the code works.
Apache Camel now includes a fantastic JBang-based app to run Camel routes. You just pass your Camel definition and… Bang!, it automatically figures out dependencies and runs it in your local machine.
Welcome Camel JBang !

Leave aside for a moment your application objectives. Ideally, before the project’s development phase starts, what the developer wants is to experiment, explore, and discover possibilities, trying out the technology at hand, but also playing with remote services.
Pairing Camel Designer and Camel JBang works really well for fast prototyping. You can rapidly make changes from Camel Designer, and immediately test them with Camel JBang. Enabling the [reload] mode allows for automatic fast restarts when you make code changes.
As an example, let’s pretend we want to figure out how to invoke a specific remote API. We can find handy public APIs on the internet available for testing purposes.
From a blank canvas in Camel Designer, select the following activities:
- [
from...] → [timer]- This action triggers the process.
- [
to...] → [https]- This action calls an HTTP endpoint.
- [
eip...] → [log]- This action logs the HTTP response.
We now configure a bit the following:
- Add the
repeatCount=1option in the Timer activity - Ensure the Log activity prints the
${body}(the response payload) - And finally, finish configuring the HTTPS activity, as shown below:
Save the file as [random-colors.xml], and from VSCode’s terminal run:
camel run random-colors.xml --reload
The command above runs Camel JBang, using our new Camel definition. The [reload] flag activates the DEV mode for on-the-fly code reloads.
Oops… I made a typo when configuring the [host]. That gave me an [UnknownHostException]. I quickly fixed it by entering the correct hostname (as per the image above) and saving the changes. JBang automatically picked up the update and gave me the following JSON output (Crimson colour) after invoking the remote API:
{"id":5239,"uid":"f6a60567-88bb-4381-8d63-0f3b003b930e","hex_value":"#aad17c","color_name":"crimson","hsl_value":[42,0.53,0.2],"hsla_value":[298,0.7,0.22,0.8]}
Tip: you’ll find the command above (
camel) very similar to the Camel K one (kamel) for running Camel in Kubernetes. In fact, you can use Camel Designer in the same manner with Camel K to iterate over code changes when enabling the DEV mode. Find under the Resources section below, a link to a Camel K live session using Camel Designer.
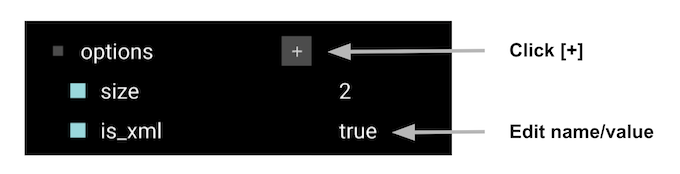
Let’s say I want to keep playing with the Color API. I can still make changes that JBang will quickly pick up. The API’s documentation indicates I can use a query parameter [size] to request multiple colours. From the configuration view, I add a new option, as per the image below:

When saving the changes, JBang kicks in and triggers a new API call. Now, the log outputs a JSON array containing two colours: Azure and Sangria.
[{"id":3326,"uid":"7699f392-f28b-47b3-a77f-c55dd02cabd5","hex_value":"#ae3166","color_name":"azure","hsl_value":[178,0.42,0.2],"hsla_value":[181,0.39,0.52,0.1]},{"id":2019,"uid":"cac82cd2-0cab-498b-a184-6ca5460615a9","hex_value":"#36bf07","color_name":"sangria","hsl_value":[124,0.7,0.24],"hsla_value":[153,0.57,0.12,0.9]}]
One last experiment: as per the API’s specification, I include a new query parameter to return XML instead of JSON:
This time I get pretty-printed XML with the Amaranth and Viridian colours:
<objects type="array">
  <object>
    <id type="integer">8958</id>
    <uid>18800029-a935-4b6b-baaf-e0efb2565b4c</uid>
    <hex-value>#8eb1b2</hex-value>
    <color-name>amaranth</color-name>
    <hsl-value type="array">
      <hsl-value type="integer">352</hsl-value>
      <hsl-value type="float">0.59</hsl-value>
      <hsl-value type="float">0.47</hsl-value>
    </hsl-value>
    <hsla-value type="array">
      <hsla-value type="integer">101</hsla-value>
      <hsla-value type="float">0.85</hsla-value>
      <hsla-value type="float">0.84</hsla-value>
      <hsla-value type="float">0.9</hsla-value>
    </hsla-value>
  </object>
  <object>
    <id type="integer">5422</id>
    <uid>542d64b8-dfcd-4b11-831c-9772ecae0ca2</uid>
    <hex-value>#5d6a63</hex-value>
    <color-name>viridian</color-name>
    <hsl-value type="array">
      <hsl-value type="integer">249</hsl-value>
      <hsl-value type="float">0.65</hsl-value>
      <hsl-value type="float">0.9</hsl-value>
    </hsl-value>
    <hsla-value type="array">
      <hsla-value type="integer">106</hsla-value>
      <hsla-value type="float">0.13</hsla-value>
      <hsla-value type="float">0.64</hsla-value>
      <hsla-value type="float">0.5</hsla-value>
    </hsla-value>
  </object>
</objects>
The simulated dev experience from above shows how fast you can create Apache Camel prototypes and how fast you can run, fail, and tweak, and re-run, and update, and retry…
Putting it all together
Gathering all the bits and pieces covered, here’s a final example that illustrates a more realistic end-to-end process, created with Camel Designer and JBang.
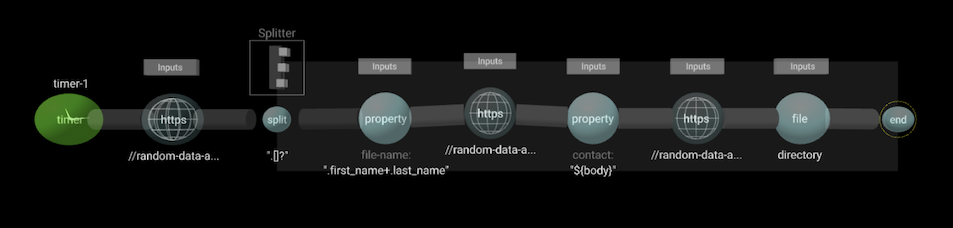
The integration process above obtains a list of users from an HTTP endpoint, then applies the Splitter EIP (enterprise integration pattern), and for each individual, makes 2 API calls to gather contact and address information, and merges the information that gets written into the file system.
Starting from a blank sheet, this is a demo you can build and run in 5 minutes!
Or, simply run the example with Camel JBang using the [random-users.xml] available from GitHub.
Install JBang, and optionally also Camel JBang.
Then run with:
camel run https://github.com/brunoNetId/example-camel-designer/random-users.xml
or if running with JBang directly:
jbang camel@apache/camel run https://github.com/brunoNetId/example-camel-designer/random-users.xml
Press [ctrl]+[c] to stop it.
You should see a new folder [directory] where Camel has stored user information.
Demo: You can find a short video demonstration of the example above in the following blog entry of Apache Camel’s website: Camel Designer’s new mapping system
Final words
As per the title, Camel Designer has now one more gear to accelerate Camel developers. And the Camel community is as vibrant as ever, producing fantastic additions like Camel JBang. Pairing both tools delivers an incredibly advantageous instrument for integrators.
Advanced Camel developers (group A) will find it very handy for fast experimentation and exploration. NewBies (group B) will find it highly valuable to quickly familiarise themselves with Apache Camel and, before they know it, be promoted to group A.
Hoping you enjoyed reading the article, I encourage continuing your journey by looking at the resources below.
Resources
Find Camel Designer in VSCode’s marketplace:
https://marketplace.visualstudio.com/items?itemName=brunoNetId.camel-designer
Find how to get started with Camel JBang
https://camel.apache.org/manual/camel-jbang.html
Learn more about JBang
https://www.jbang.dev
Watch a short demo showing Camel Designer and Camel JBang in action heading to: https://camel.apache.org/blog/2022/07/camel-designer-jbang
Learn how Camel Designer integrates with AtlasMap
https://camel.apache.org/blog/2022/04/camel-designer-atlasmap/
See Camel Designer in action in this Camel K live session:
https://www.youtube.com/watch?v=s0RudKOp424
Find some of the showcased examples in the following GitHub project:
https://github.com/brunoNetId/example-camel-designer